Windows 64-bit Installer

How to Install AutoVideo on Windows

Fast 3-step setup guide and practical tips for common Windows 10 and Windows 11 security prompts.

Download official release for Windows

Version 0.5.31 · Size 0.9 GB · Free 7-day trial

3 simple installation steps on your PC

Step 1

Download & Keep the installer

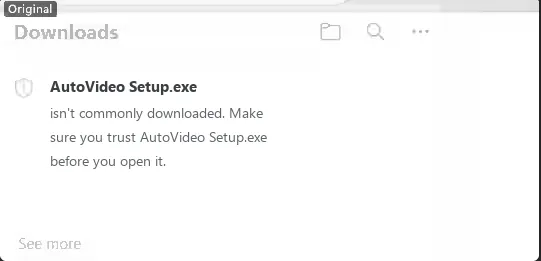
Click the Download for Windows button above. When Chrome or Edge finishes downloading, because this is an independent standalone package, the browser may ask for confirmation:

  1. Look at the download tray in Chrome or Edge.
  2. If you see a notice saying the file isn't commonly downloaded, click the three dots or right-click the file entry.
  3. Select Keep, then click Keep anyway to proceed with the download.
Screenshot showing Keep and Keep anyway action in Chrome browser
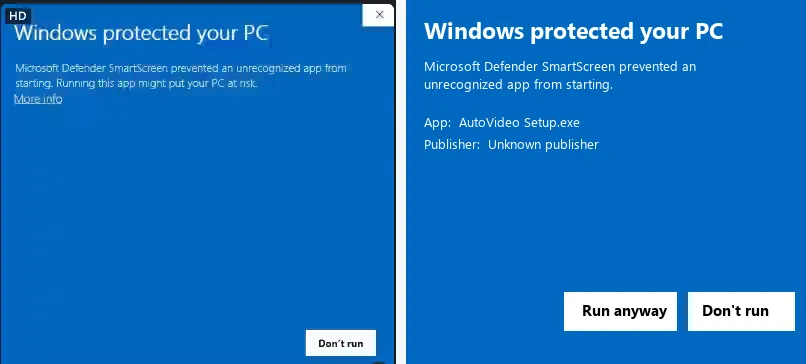
Screenshot showing Windows SmartScreen clicking More info and Run anyway
Step 2

Handle Windows SmartScreen & User Account Control

Launch the downloaded setup file. On modern Windows editions, Microsoft Defender SmartScreen displays a blue protection dialog:

  1. Click the small underline link labeled More info.
  2. Click the Run anyway button that appears at the bottom.
  3. When the Windows User Account Control (UAC) prompt asks "Do you want to allow this app to make changes?", click Yes.
Step 3

Open AutoVideo & Enjoy your 7-day free trial

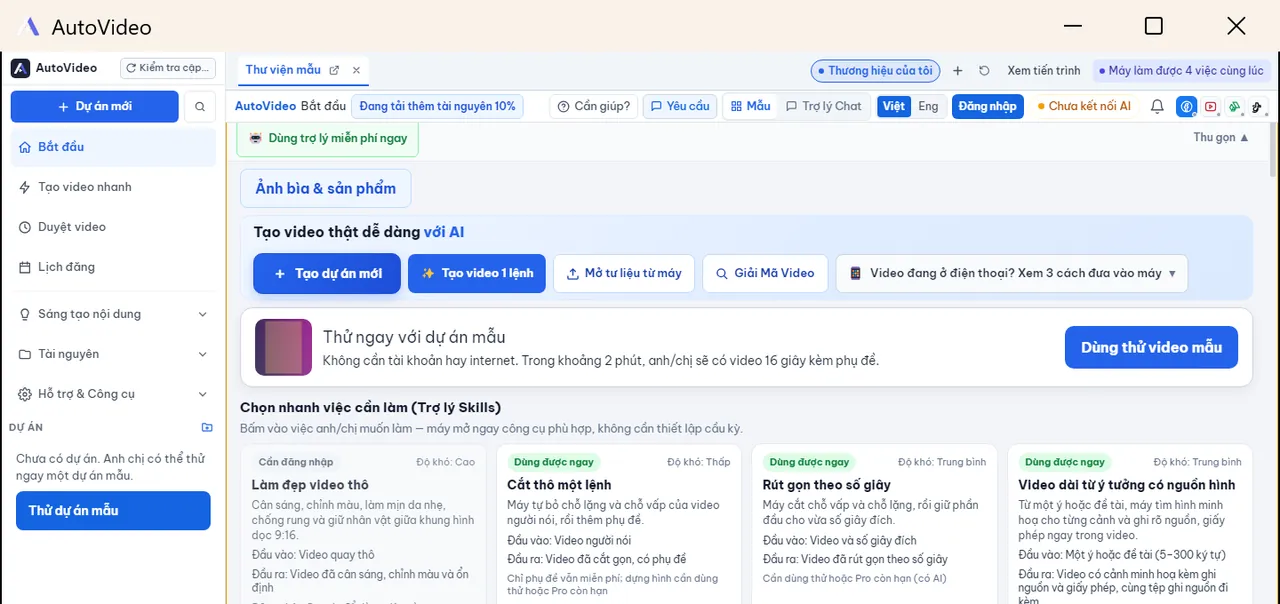
Installation finishes in seconds and AutoVideo opens automatically with an intuitive dashboard:

  1. Explore the preloaded sample projects to experience vertical video assembly.
  2. Click Sign in with Google to activate your 7-day free trial on this computer.
  3. No credit card required. Experience all capabilities with zero barriers.
Screenshot of AutoVideo Start screen with Google login and 7-day trial active

Practical Troubleshooting

Common Windows questions & solutions

Everyday solutions for standard security dialogs during setup.

1. Windows Defender SmartScreen displays "Windows protected your PC"?

This is a standard precaution from Microsoft for newly published software. Simply click the underlined text "More info", then click "Run anyway" to continue.

2. User Account Control (UAC) dialog asks for permission?

Click "Yes" to allow the installer to unpack application files into your local user app directory. AutoVideo does not require Administrator rights during normal daily usage.

3. Chrome or Edge flags the file with a caution icon?

Click the three dots (…) beside the file name in your download tray, select "Keep", and choose "Keep anyway". The download finishes cleanly.

4. Antivirus software or disk storage warning?

If third-party antivirus software prompts for inspection, add AutoVideo to your trusted applications list. Ensure your hard drive has at least 5 GB of free space for smooth video rendering.

5. Upgrading from a previous version without losing data?

Close your running AutoVideo application, download the latest installer, and run it. The new release installs directly over the old version while preserving all your local projects, custom templates, and channel tokens.

6. Exporting draft to CapCut PC produces an error?

Ensure CapCut PC is closed before clicking the export button in AutoVideo. Once the draft export completes successfully, launch CapCut to view and polish your synchronized timeline.

Still have questions?

Contact our support team directly via Zalo at 0915.849.968, Facebook Messenger at SamNguyen.vn, or email tuvan@samnguyenphoto.com.